Introduction
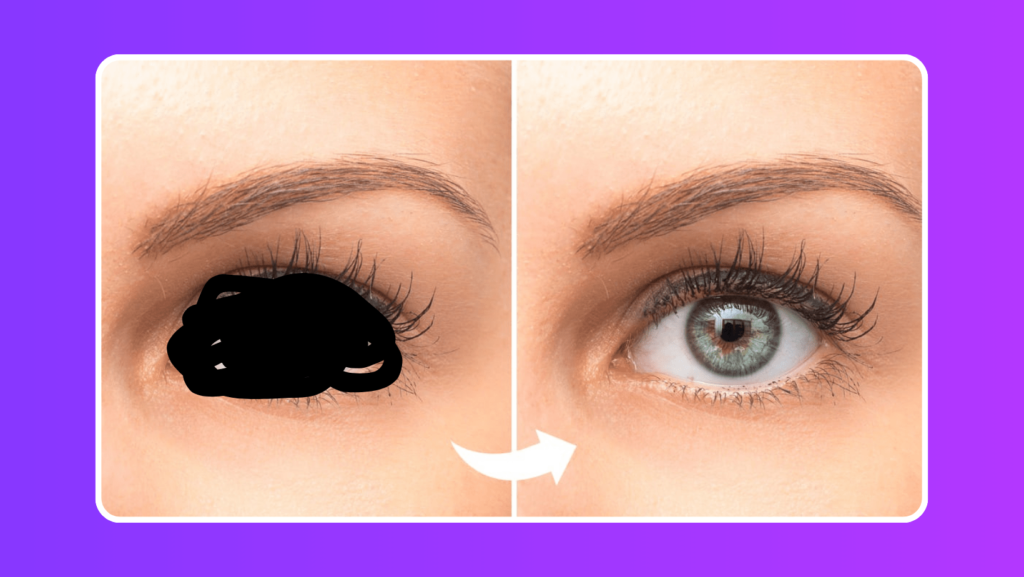
Have you ever encountered a situation where the eyes in your character’s image look weird or sketchy?
It can be frustrating, especially if you’ve put a lot of effort into creating the perfect character.
But here’s the good news: I’m here to help you with that, from start to finish.
In this article I’m going to show you everything you need to know about how to use inpaint to fix eyes, especially in stable diffusion, to make those eyes sparkle and captivate in your photos.
It’s time to wave goodbye to photo imperfections and say hello to the stunning, eye-catching images you’ve always wanted.
What is Image inpainting?
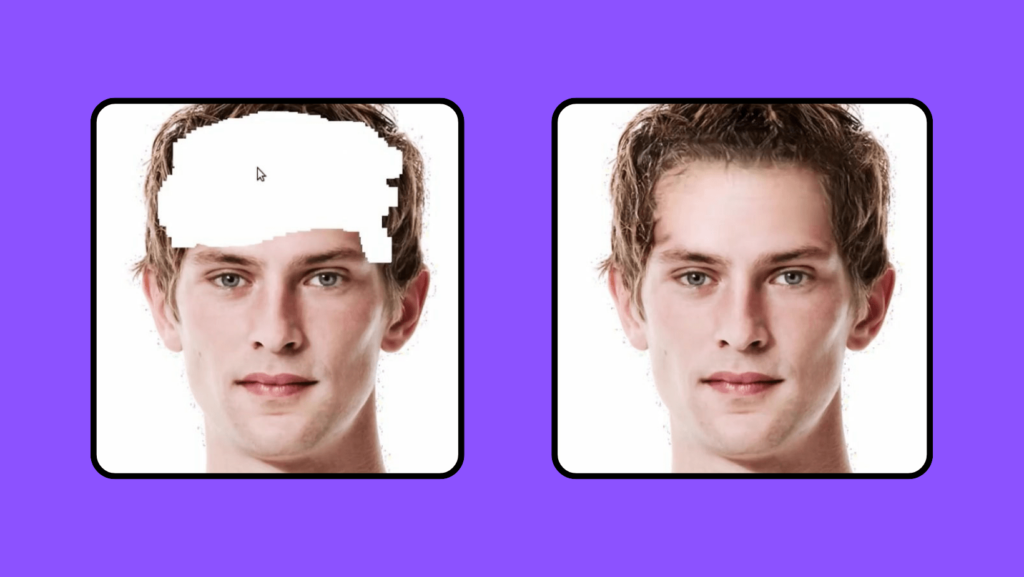
Image inpainting is like a magical tool for fixing pictures.
It’s used when you have a photo with some parts missing or messed up, and you want to make it look good again.
This tool looks at the stuff around the missing or messed up parts and figures out what should be there.
Then, it paints those parts in a clever way to make the picture complete and nice.
You can use inpaint to fix eyes, red eyes, nose and other blurred part on the face.
Inpainting algorithms analyze the surrounding information in the image to intelligently generate a plausible replacement for the missing or damaged regions.
Key aspects of image inpainting include:
- Context: It uses nearby image information to fix or fill in missing parts.
- Patch Matching: It finds similar pixel patterns to make the fixed part blend well with the rest of the image.
- Object Removal: It can remove unwanted stuff from a picture by replacing it with appropriate content from the surroundings.
- Texture and Structure: It creates textures and structures that fit the image, making the fix look real.
- Applications: It’s used for fixing old photos, erasing objects, and editing images in fields like art restoration, forensics, and graphic design software.
Image inpainting has gotten a big boost from fancy tech called deep learning.
Think of it like super-smart computer brains.
These brains, especially convolutional neural networks (CNNs) and generative adversarial networks (GANs), are really good at fixing and finishing pictures.
They make the fixed parts look super real, like they were never broken.
So, these brainy tools are a big help for all kinds of picture jobs!
How does inpainting works in stable diffusion?
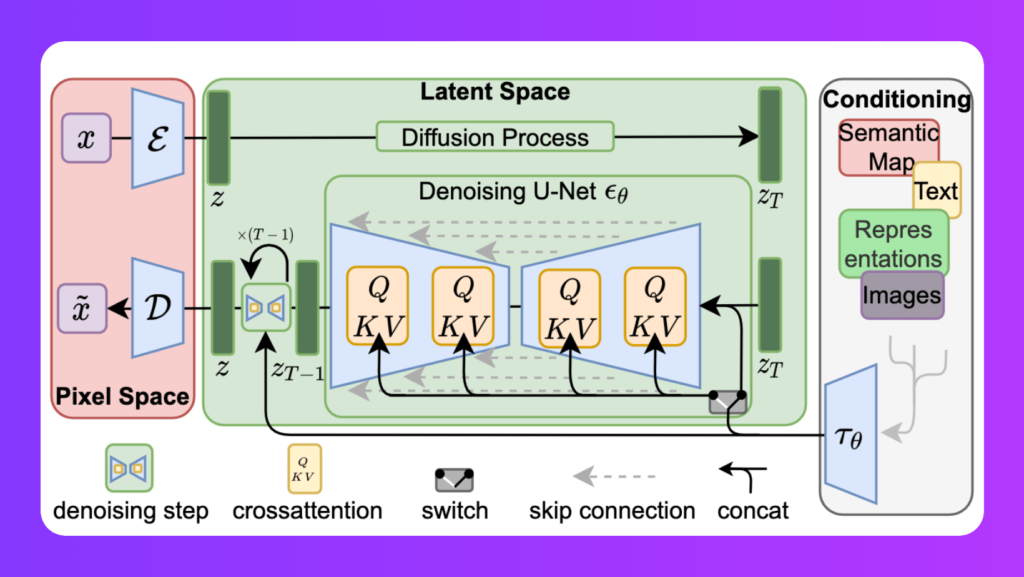
Stable Diffusion Inpainting utilizes precise mathematical techniques, like painting on a canvas.
It harnesses “heat diffusion magic,” a mathematical concept at the core of its image restoration.
The math in Stable Diffusion is highly controlled, ensuring the final result not only appears realistic but also integrates seamlessly with the rest of the image.
This tool is versatile, used in photography, restoring old films, medical images, and digital art, capable of removing unwanted elements, repairing damaged parts, and creatively blending components to create stunning images.
Let’s dive into to a step-by-step guide about how to use inpaint to fix eyes?
How to use inpaint to fix eyes in stable diffusion?
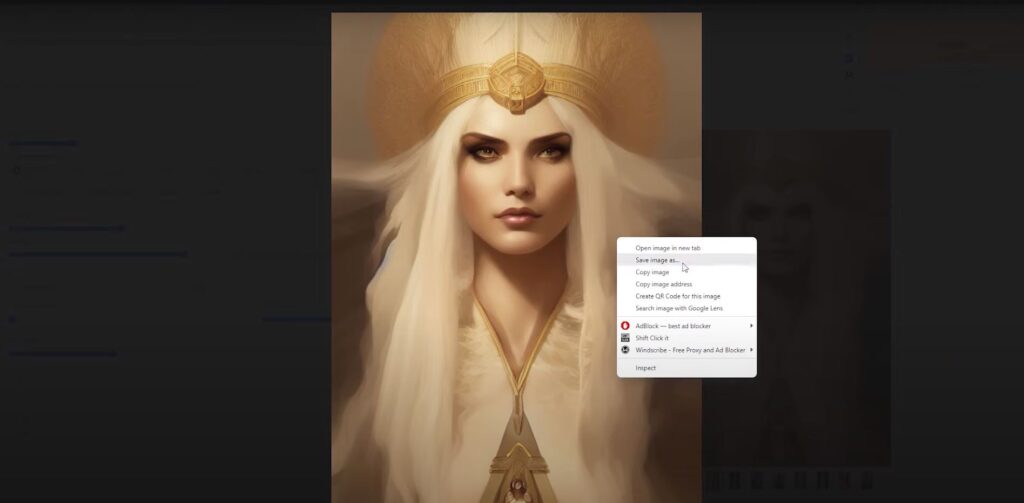
Step 1: Safeguard Your Creation - Save Your Image
As with any artistic endeavor, it’s wise to start by safeguarding your work. Before embarking on the eye transformation journey, save your character’s image. This precaution ensures that your original masterpiece remains intact.
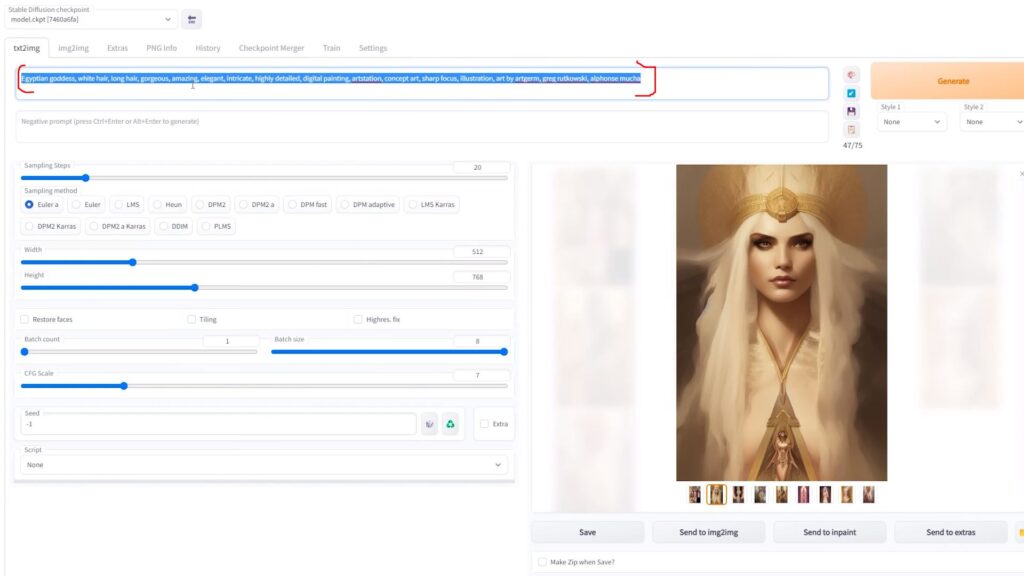
Step 2: Harness the Power of Language - Copy the Magical Prompt
Here, you’re copying the specific instruction or prompt that was initially used to generate the image. This prompt will serve as a reference for the AI, helping it understand the specific changes you want to make to the eyes.
Step 3: Enter the Realm of Image Alchemy - Access the Image to Image Tab
You’re now entering the section of your image editing software that’s dedicated to the inpainting process. This is where the actual magic happens. Navigate to the “Image to Image” tab in your image editing software. Here, the real enchantment begins.

Step 4: Imprint Your Desires - Paste the Secret Incantation
Within the “Image to Image” tab, you’ll unveil the sacred canvas for your sorcery. Paste the magical prompt, which holds the key to the AI’s understanding of your desired eye transformation.

Step 5: Evoke the Inpainting Portal - Unleash the Magic of Inpaint
With your canvas prepped, you’re ready to unlock the inpainting portal. This is where the real enchantment takes place, where your character’s eyes will be reborn.

Step 6: Conjure the Vision - Upload Your Image
Upload your character’s image into the inpainting tool. This is where creativity and magic come together.

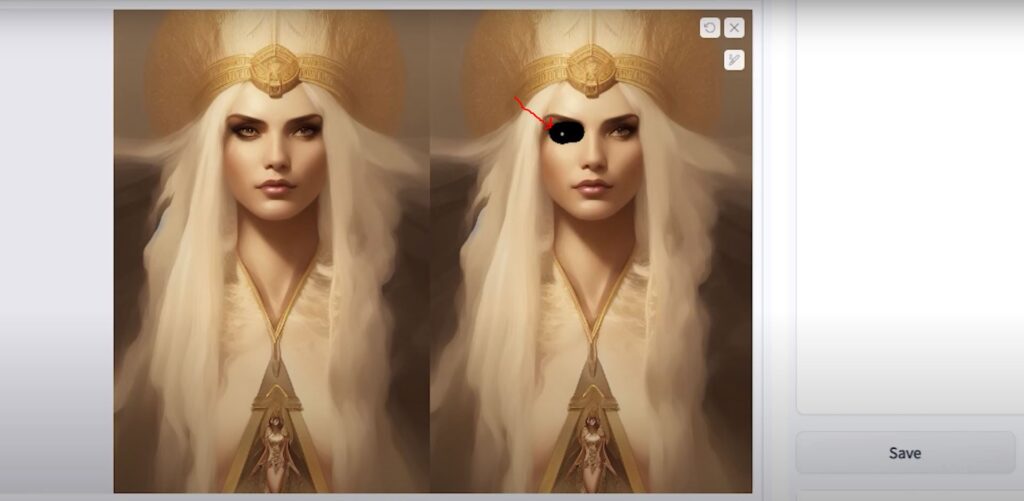
Step 7: Unleash Your Artistic Flourish - Paint the Eyes with Intent
Channel your inner artist and, with intent, begin to paint over the eyes that trouble you. This act of personal touch empowers the AI to understand the specifics of your vision.
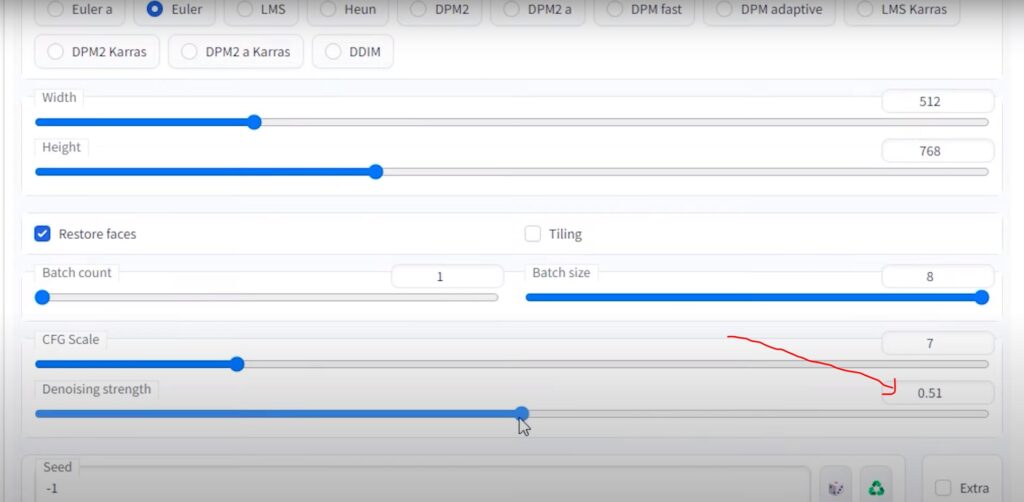
Step 8: Tune the Time Stream - Adjust Sampling Settings
In the time stream of inpainting, increase the sampling steps to 40. This fine-tunes the AI’s perception, making it sensitive to your artistic nuances. Change the sampling method to Euler for even greater precision.

Step 9: Reawaken the Lost Beauty - Invoke the Faces of Restoration
Find the “Restore Faces” button within the inpainting tool. This is where your character’s eyes will be rejuvenated.

Step 10: Enchant with Multiplicity - Dance with the Batch Count
Maximize the batch count for an extensive range of options. A higher count offers more possibilities, though it may slightly lengthen the process.

Step 11: Whisper the Secrets of Clarity - Diminish the Noise
In this final stage, whisper the secrets of clarity by reducing the denoise instrument setting to 0.5. This clears away the distractions, letting your vision shine through.
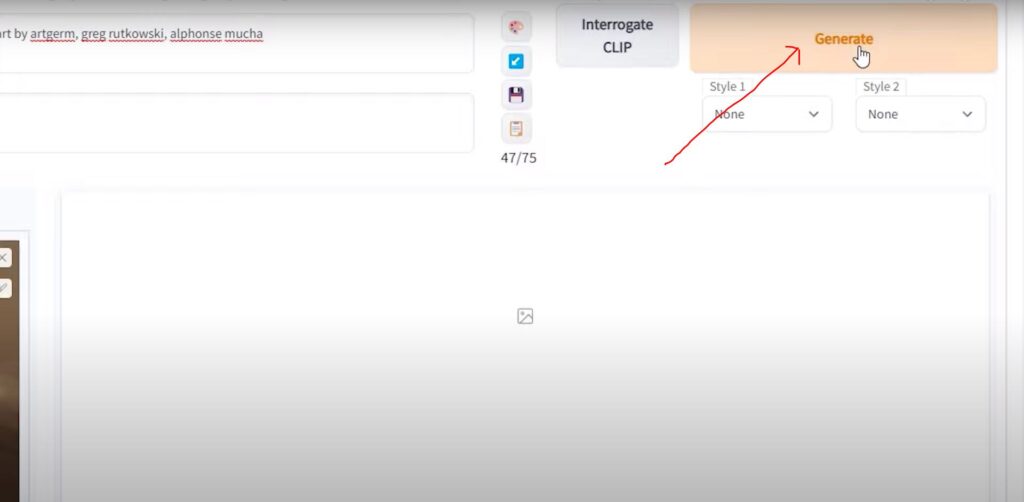
Step 12: Manifest Your Dream - Invoke the Generation
It’s time to manifest your dream. Invoke the generation and watch as the magic unfolds. Multiple sets of eyes will appear before you. Patiently cycle through them until you discover the pair that embodies your character’s true essence.
“Credit for this step-by-step guide goes to JAMES CUNLIFFE, the creator of the video: Fixing Eyes With Img2Img Inpainting In Stable Diffusion“
Now, let’s have a look at some actionable tips that will help you to fix eyes using inpaint in stable diffusion.
Fixing Eyes Using Inpaint in Stable Diffusion: Tips and Tricks
Eyes are often the focal point of an image, and getting them just right is essential for creating a compelling character or portrait.
Inpainting using Stable Diffusion is a powerful technique that can help you correct and enhance the eyes in your images.
Here are some actionable tips to help you master this art:
1. Begin with a High-Quality Image: Start with a clear and well-lit image for the best inpainting results.
2. Select an Appropriate Brush Size: Use a brush size that matches the area you’re working on; smaller brushes offer greater precision for eye details.
3. Experiment with Sampling Methods: Try different sampling methods to find the one that best suits your image.
4. Adjust Sampling Steps: Increase sampling steps for intricate work (e.g., eyes) to capture fine details.
5. Tweak Batch Count: Incrementally increase the batch count for more options; lower counts speed up the process.
6. Utilize Denoising: Apply denoising to reduce noise and maintain image quality; a setting of 0.5 is a good starting point.
7. Save Iteratively: Save multiple iterations for easy comparisons and reversions.
8. Prioritize Realism: Aim for a balance between perfection and realism to avoid unnatural results.
9. Reference Images: Use reference images as a guide for achieving a specific look or style.
10. Practice Makes Perfect: Mastery comes with practice, so keep refining your inpainting skills for captivating, lifelike eyes.
Stable Diffusion inpainting vs other tools
Fixing eyes with Stable diffusion inpainting is a valuable tool for enhancing your images, particularly when you need to fix flaws and create a more realistic look.
However, there are some other powerful options on the scene.
For instance, Adobe Photoshop’s Generative Fill is a sophisticated tool that uses deep learning to intelligently fill in missing parts of your pictures.
Adobe’s Content-Aware Fill and Healing Brush have been reliable go-to choices for some time.
In addition to these, there are some newcomers worth mentioning, such as Midjourney, HotPot AI, Starry AI, and Pincel.
These new players offer unique inpainting features, adding depth to the competitive landscape.
This diversity in inpainting tools provides users with a range of options to perfect their images, contributing to the ongoing innovation in image editing.
Final Thoughts
In conclusion, using inpaint to fix eyes, especially in stable diffusion, is like having a magical wand for transforming and perfecting your images.
It’s a powerful tool that lets you fix imperfections, enhance the eyes of your characters, and create stunning visuals with just a few clicks.
With the help of advanced AI and mathematical techniques, you can achieve results that are not only realistic but also seamlessly integrated into your pictures.
While stable diffusion inpainting is a fantastic option, there are also other tools in the field like Adobe Photoshop’s Generative Fill and Content-Aware Fill, along with emerging players such as Midjourney, HotPot AI, Starry AI, and Pincel, offering a diverse range of inpainting features.
So, whether you’re an artist, a photographer, or just someone who loves beautiful images, these tools are here to help you turn your vision into reality.
Say goodbye to photo imperfections and hello to captivating, eye-catching images!