Introduction
Picture this: you’re working on an image, and you want to make some precise adjustments, maybe change the color of a specific object, or seamlessly repair an area within the picture.
That’s where masks in Comfy UI come to the rescue.
Masks are a powerful tool in Comfy UI (User Interface), allowing you to select specific areas of an image for various purposes such as image manipulation, in-painting, and more.
In this article, we will explore the fundamentals of ComfyUI inpainting, working with masks in Comfy UI, how to create, modify, and use them effectively.
We’ll also cover some custom nodes and techniques to enhance your workflow.
If you’ve ever grappled with image editing, these masks might just be your newfound solution.
What is Comfy UI?
ComfyUI is a user-friendly, code-free interface for Stable Diffusion, a powerful generative art algorithm.
It lets you create intricate images without any coding.
It’s compatible with various Stable Diffusion versions, including SD1.x, SD2.x, and SDXL, so you can tap into all the latest advancements.
It offers features like an asynchronous queue system, smart optimization, and support for both GPUs and CPUs.
Whether you’re new to the game or a pro, ComfyUI simplifies image modification and composition, making it accessible and enjoyable for everyone.
What is ComfyUI Inpainting?
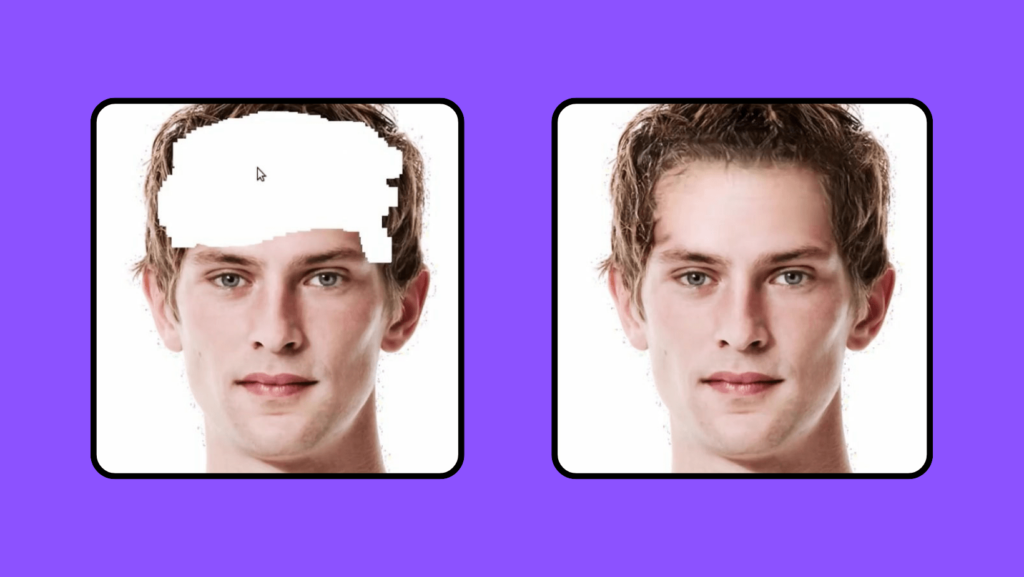
ComfyUI inpainting is a trick in image editing where you can fix up or replace missing or damaged parts of a picture while keeping everything else looking just right.
It all starts with these masks, which are kind of like your instructions for the image.
You paint the areas to be fixed in white, and the rest stays black.
Gray shades help control how much fixing you want in different spots.
So, when you’ve got your mask all set up, you use it to highlight the part in your picture that needs some TLC.
Understanding Masks:
A mask is typically a black and white or grayscale image used to select specific areas within another image.
Masks can be used for a variety of tasks, including cutting out one image from another, selecting areas for specific processes, and more.
In Comfy UI, masks are essential, especially in the context of in-painting.
Creating and Editing Masks:
1. Load Image as Mask:
You can load a mask from a black and white or grayscale image saved on your hard drive.
Use the “Load Image as Mask” function in Comfy UI.
Alternatively, you can use the “Load Image Node” to load an image, but it may not provide as much flexibility when choosing the channel to use.
2. Mask Editor:
You can edit masks using the Mask Editor in Comfy UI.
Open the Mask Editor by right-clicking on the image and selecting “Open in Mask Editor.“
Use the editing tools in the Mask Editor to paint over the areas you want to select.
After editing, save the mask to a node to apply it to your workflow.
Using Masks for Image Modification:
1. Modifying Color:
You can use masks to modify colors in specific areas of an image.
Use nodes like “Mix Color by Mask” to change the color of a selected area.
Adjust blending modes and opacity to control the effect.
2. InPainting:
Avoid using the “Encode for InPainting” node, as it creates a separate grayscale image that may not align with the original.
Instead, use the “Set Latent Noise Mask” node to perform inpainting.
Adjust the noise level to control the degree of inpainting.
Automating Mask-Based Selections:
1. ClipSec:
Custom nodes like ClipSec can automatically detect and select objects or areas in an image.
You can specify keywords, and the node will attempt to identify and select those elements.
ClipSec can be a powerful tool for automating selections based on your input.
2. Replacing Objects:
You can replace objects or elements within an image using masks and ClipSec.
By selecting objects and specifying replacement keywords, you can replace the detected objects with new elements.
Comfy UI vs SDXL Automatic 1111 - Which is best for you?
When it comes to generative art, you have a big decision to make between Comfy UI and Stable Diffusion Automatic 1111.
Comfy UI is great for people who aren’t into coding because it’s easy to use.
You don’t need to know how to code, and it’s quick at making images.
You can also change lots of things like how the images look and get rid of unwanted stuff in them.
Comfy UI’s customization options and advanced features, including diverse sampling methods and noise control, simplify complex tasks like inpainting and object replacement.
Stable Diffusion Automatic 1111 is powerful but needs you to know a lot about coding.
If you’re good with typing commands, it’s a useful tool for creating images.
The choice depends on what you like to do and how good you are with technical stuff because both options are cool for making art with AI.
Final Thoughts
Masks are a versatile tool in Comfy UI, offering a wide range of applications, from color manipulation and in-painting to object selection and replacement.
By understanding how to create, edit, and apply masks effectively, you can significantly enhance your image editing capabilities in Comfy UI.
Explore the various custom nodes and techniques available to streamline your workflow and create stunning visuals.